One of my goals for this hobby and my layout in my back yard was to keep my grandchildren involved and excited about the different aspects of model railroading. One of the ways to do this is to keep it very personal and have them involved. Here is JP helping me test Percy
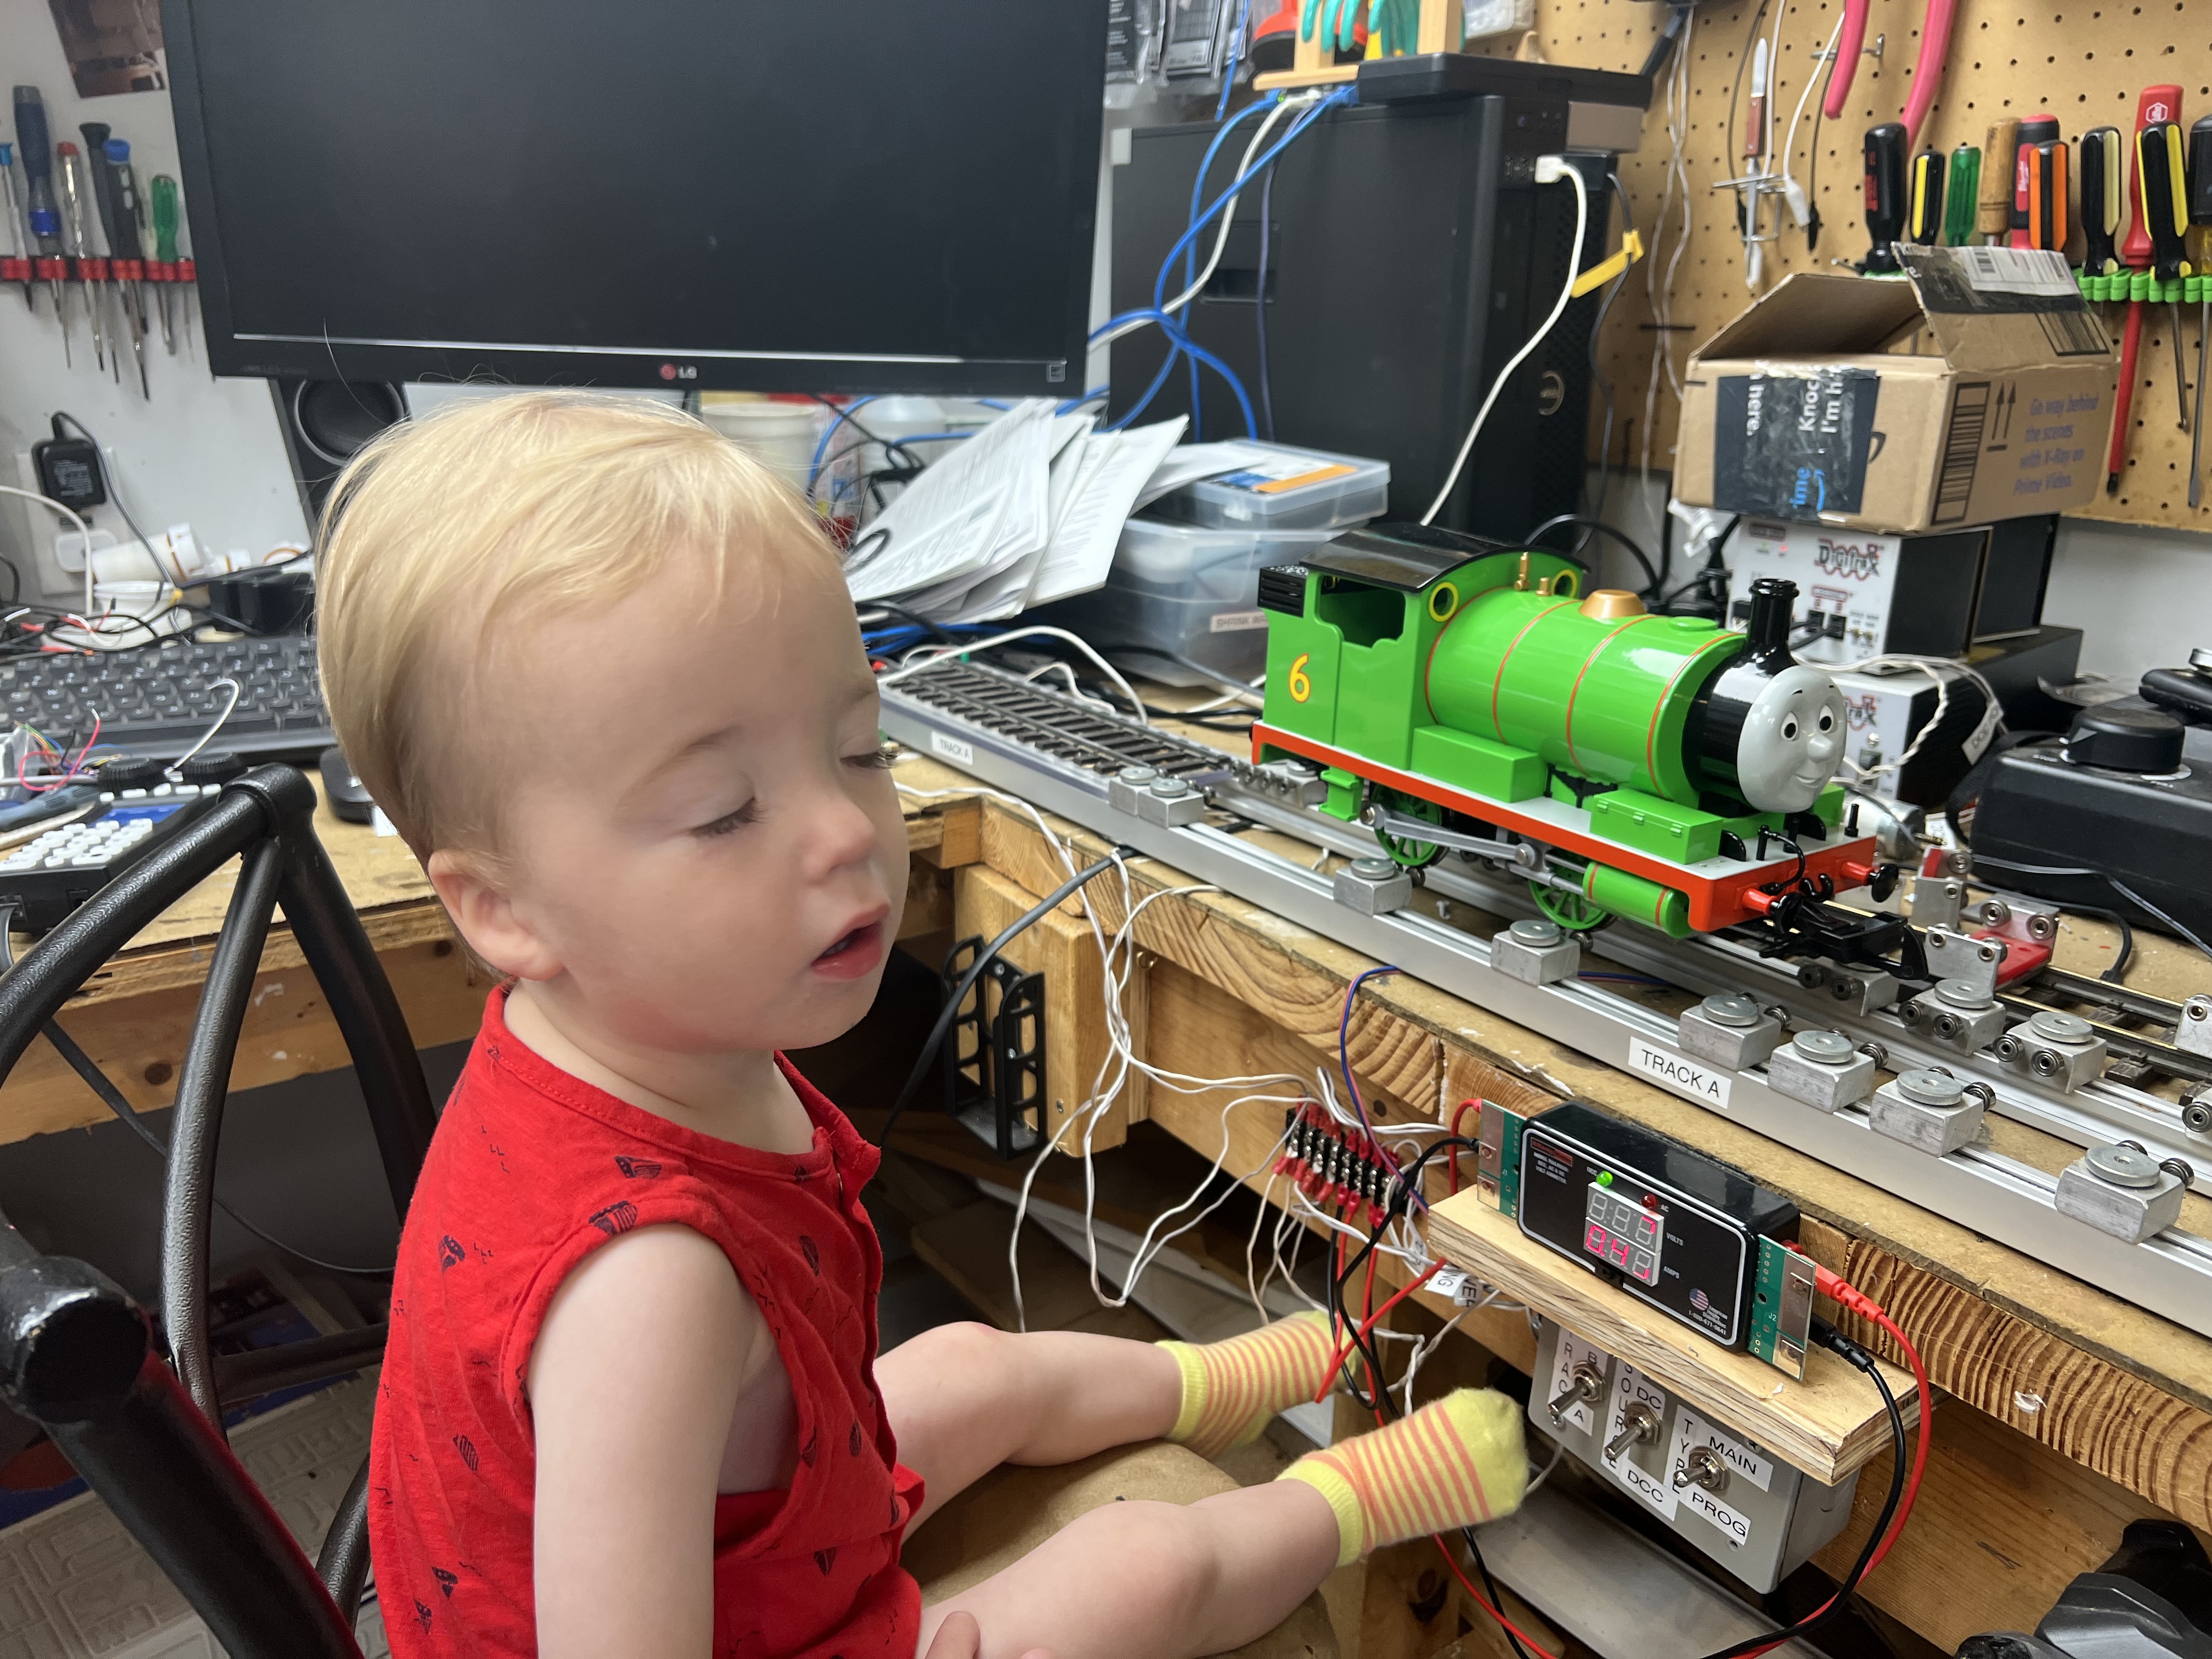
On their 8th birthday, I let them pick out their own locomotive to buy if I don’t have it or I give it to them if I have it. This is their locomotive to run and use on my layout whenever they want. I also wanted to make the locomotive even more for them so I wanted to load in their voices and select songs or other sounds that their locomotive will play back for them.
I recorded each grandchild with some of the following sayings (and others):
I love being an Engineer, Let’s Take a train Ride
Don’t Leave Nana Behind, Keep up Papa, the Train is leaving
Time for the Grandchildren to work on the Railroad {Finish}
Hopefully over time they will pick their own sayings and be creative.
I searched for a decoder that would allow me to download these sounds and songs. I found that Zimo did an excellent job for that. Especially their series of MS deciders that have a lot of memory for storage of sounds. http://www.zimo.at/web2010/index.html
I had been using the Digitrax Decoders with the Phoenix Sound card and found Zimo to be a lot more functional, many more programming options, and sound integrated into all parts of the programming.
I use the Zimo ZSP program to create a locomotive sound template for all of my locomotives including the grandchildren locomotives.
This requires me to take apart each locomotive, wire up a Zimo Sound Decoder into the locomotive. While I have it apart, I add many LED options and a smoke unit in addition to the speaker. Some of my favorite LED options is to create ditch lights (lights that flash alternately) in the front of the train. Depending on the locomotive I create truck lights (point down on the tracks) that are colored and flash, a rear light, cab light, and stair lights. I wire up each LED light with a current limiter and connect them to one of the function outputs from the Zimo Sound Decoder. I also add a special connector under the locomotive to connect track voltage for use on the test work bench. The ditch lights utilize custom 3D printed led light housings.
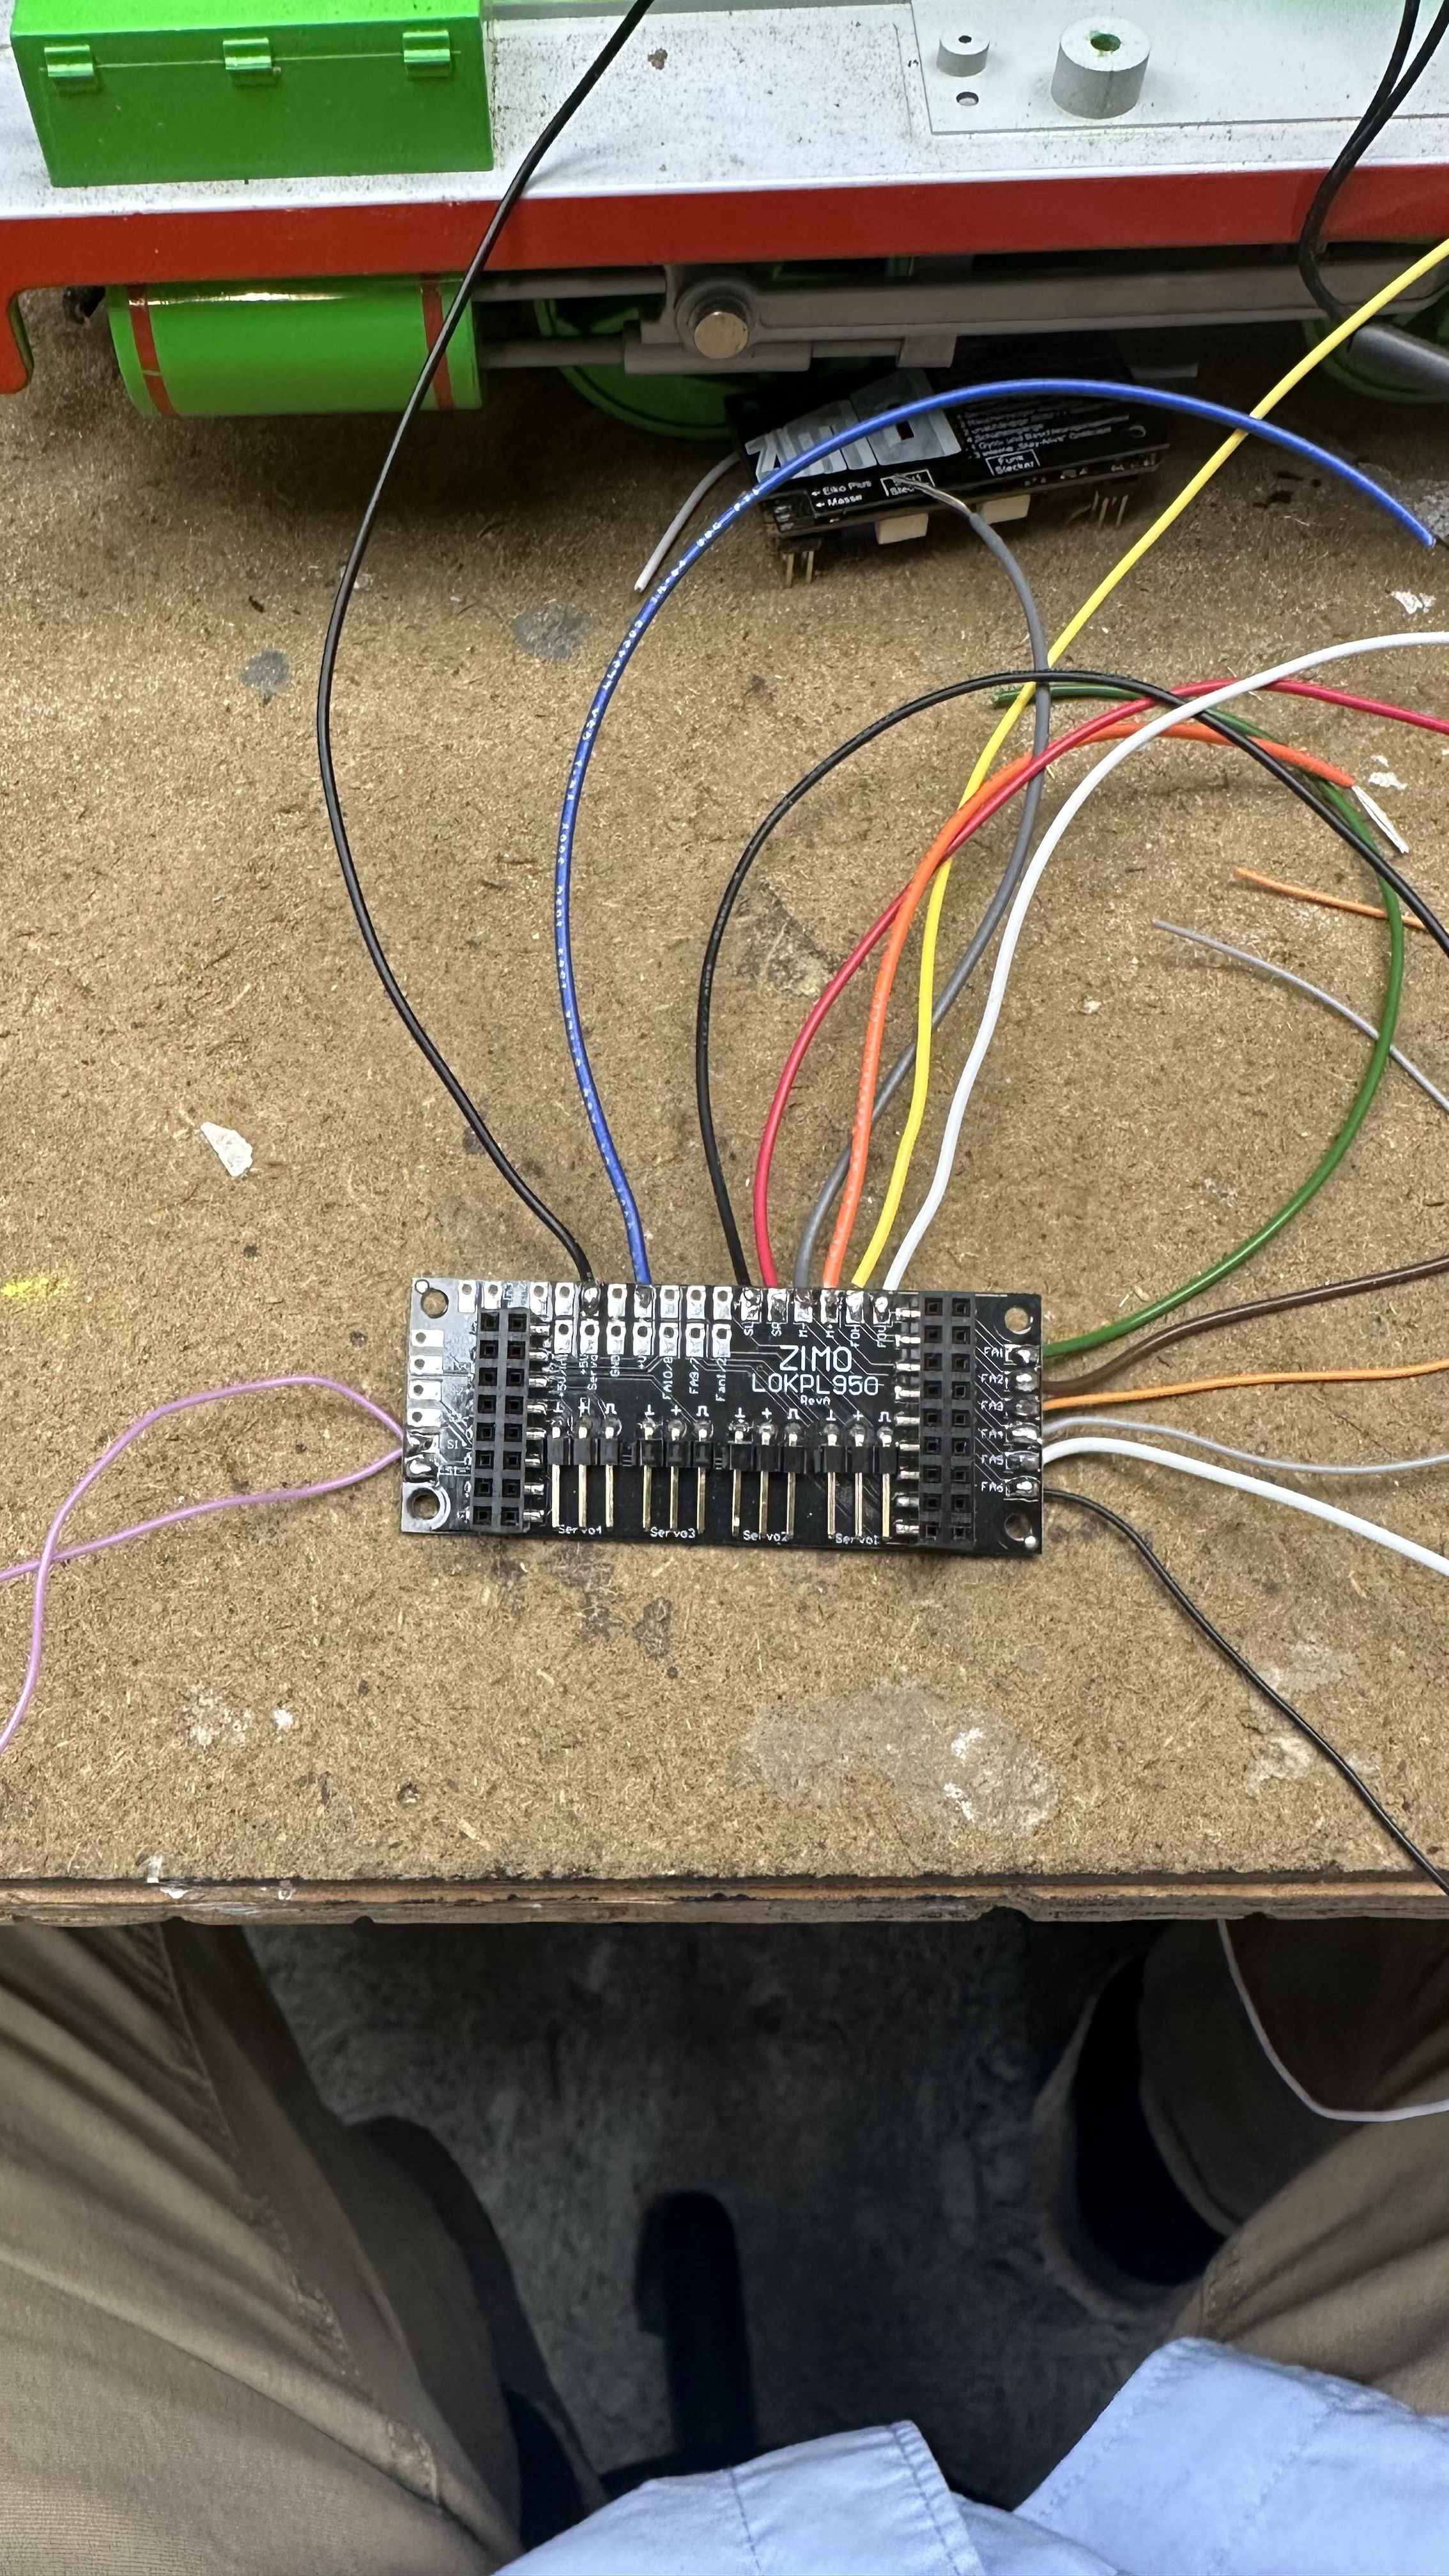
My favorite Zimo sound decoders are the MS450 for small single motor engines and the MS950 for larger locomotives. See pictures below of the installation of the MS450 for the Galloping Goose engine.


I also create sound files from the Zimo Sound Database listed on their website. I modified the sound file with the Zimo Sound Program that runs on a Windows PC as listed below. For special sounds I record them on my iPhone, modify them to be mono, 22hz, 16 bit, saved as a .wav file. Many programs can do this, I use Wavepad on my Mac.
Here are the steps to modify Percy a Bauchamn locomotive. The locomotive comes as DC only and I modify the locomotive to install a Zimo MS950 sound decoder to allow it to run on a DCC controlled track.
Step 1, take out all the circuit boards including the one attached to the motor. Notice that I have added a plug that will be track power from a second car attached to Percy. This will allow for me to connect the track power and avoid any issues using the wheels for power pickup during testing.

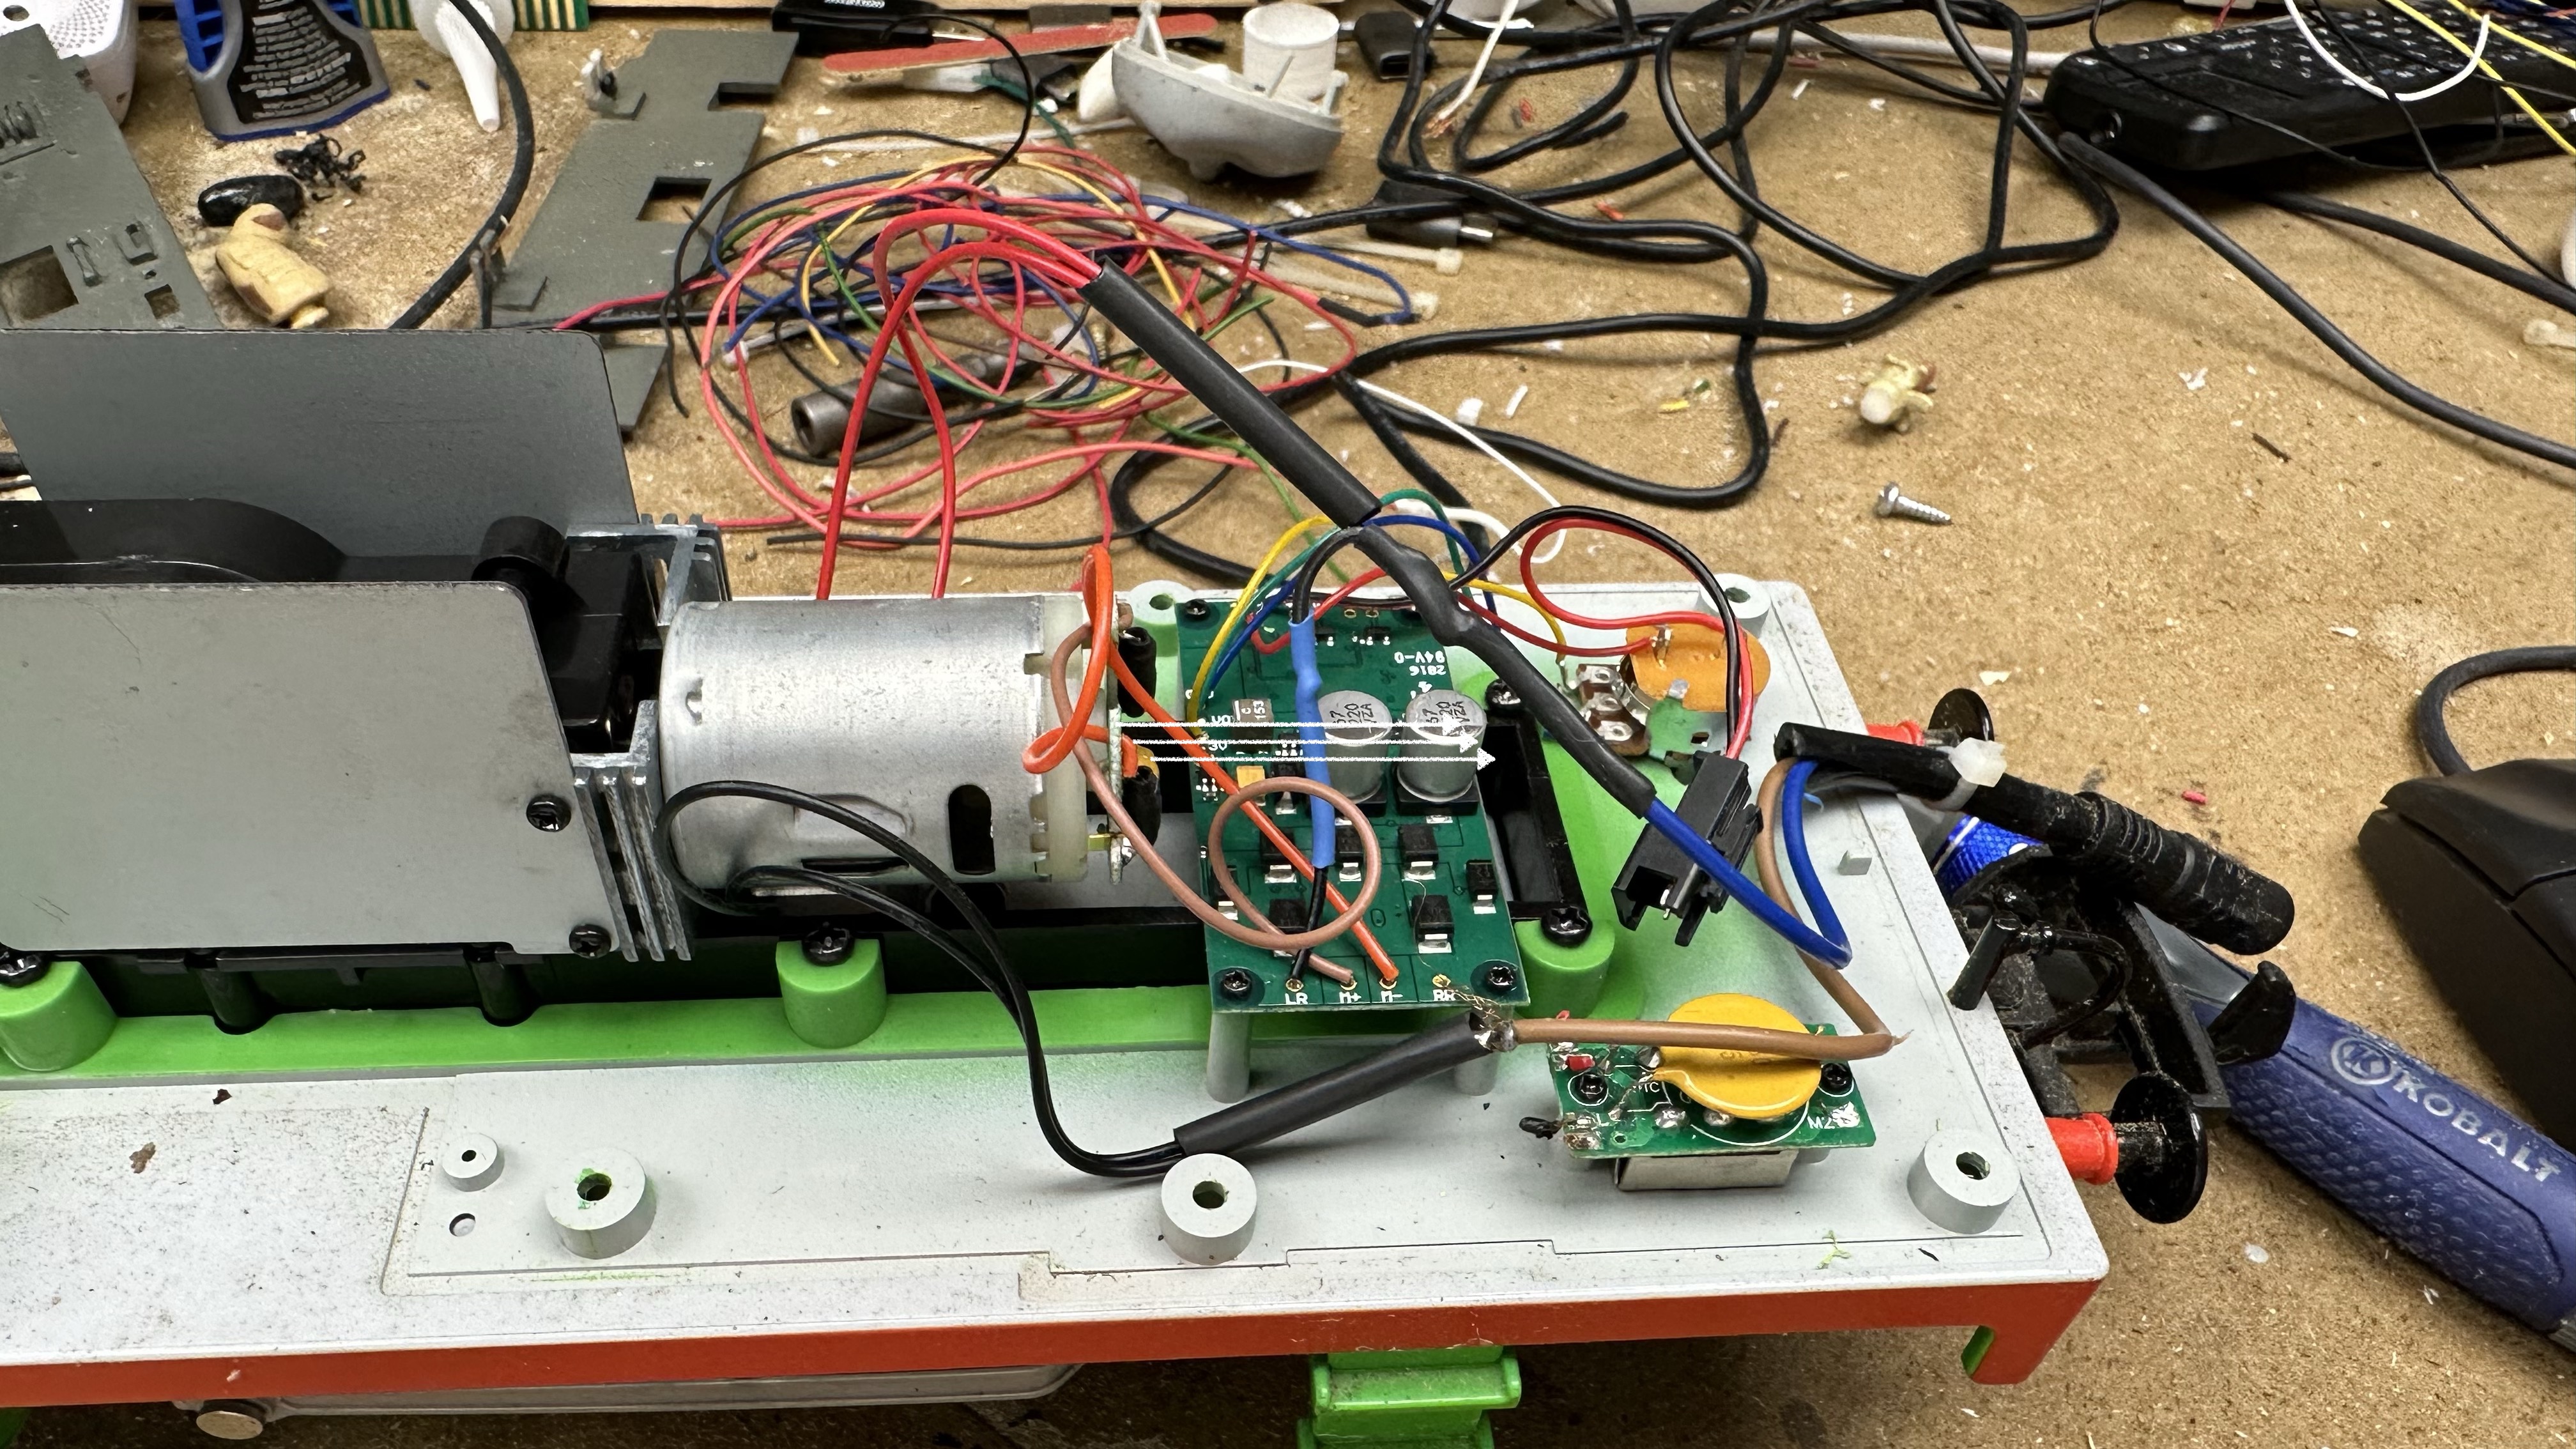
Step 2, I added two front lights and have wired them up to be ditch lights. This is specific function on the Zimo Decoder board. The ditch lights are 3D printed to model the Thomas front light style. The 3D design was done by my son in law. The lights are wired using the IC LED DRIVER LINEAR 25MA TO92-3 https://www.digikey.com/en/products/detail/microchip-technology/CL25N3-G/4902352?utm_adgroup=&utm_source=google&utm_medium=cpc&utm_campaign=PMax%20Shopping_Product_Medium%20ROAS%20Categories&utm_term=&utm_content=&utm_id=go_cmp-20223376311_adg-_ad-__dev-c_ext-_prd-4902352_sig-CjwKCAiAk9itBhASEiwA1my_60FwDZ_GgPBs8vH_SyDVYbWE523-HMUDfEJedcgLzMMaJSfzFO8YNBoCHhgQAvD_BwE&gad_source=1&gclid=CjwKCAiAk9itBhASEiwA1my_60FwDZ_GgPBs8vH_SyDVYbWE523-HMUDfEJedcgLzMMaJSfzFO8YNBoCHhgQAvD_BwE to limit the current to the LEDs no matter the voltage. The LEDs are then wired to the MS950. I use 5mm LED bright white lights for the ditch lights.


Step 3, I added a cabin light as well as a rear light. The rear light is modeled after the Thomas style and is another 3D printed light. I also utilized a 3D printed LED holder for the cab light. Both of these lights utilize the xxxx to limit the current. I use a 5mm Bright White LED lights for the rear light and a 5mm Warm white LED light for the cab light.


Step 4, I added two strip LED lights for under the frame of Percy. I utilize a 5v controller that attaches to the Strip LED lights. The controller uses a remote control to change the pattern, color and intensity of the LED strip lights. Since the LED strip lights are a higher amperage, I connect them to the 5v Server connector of the MS950 not a standard function which does not have the amperage required.


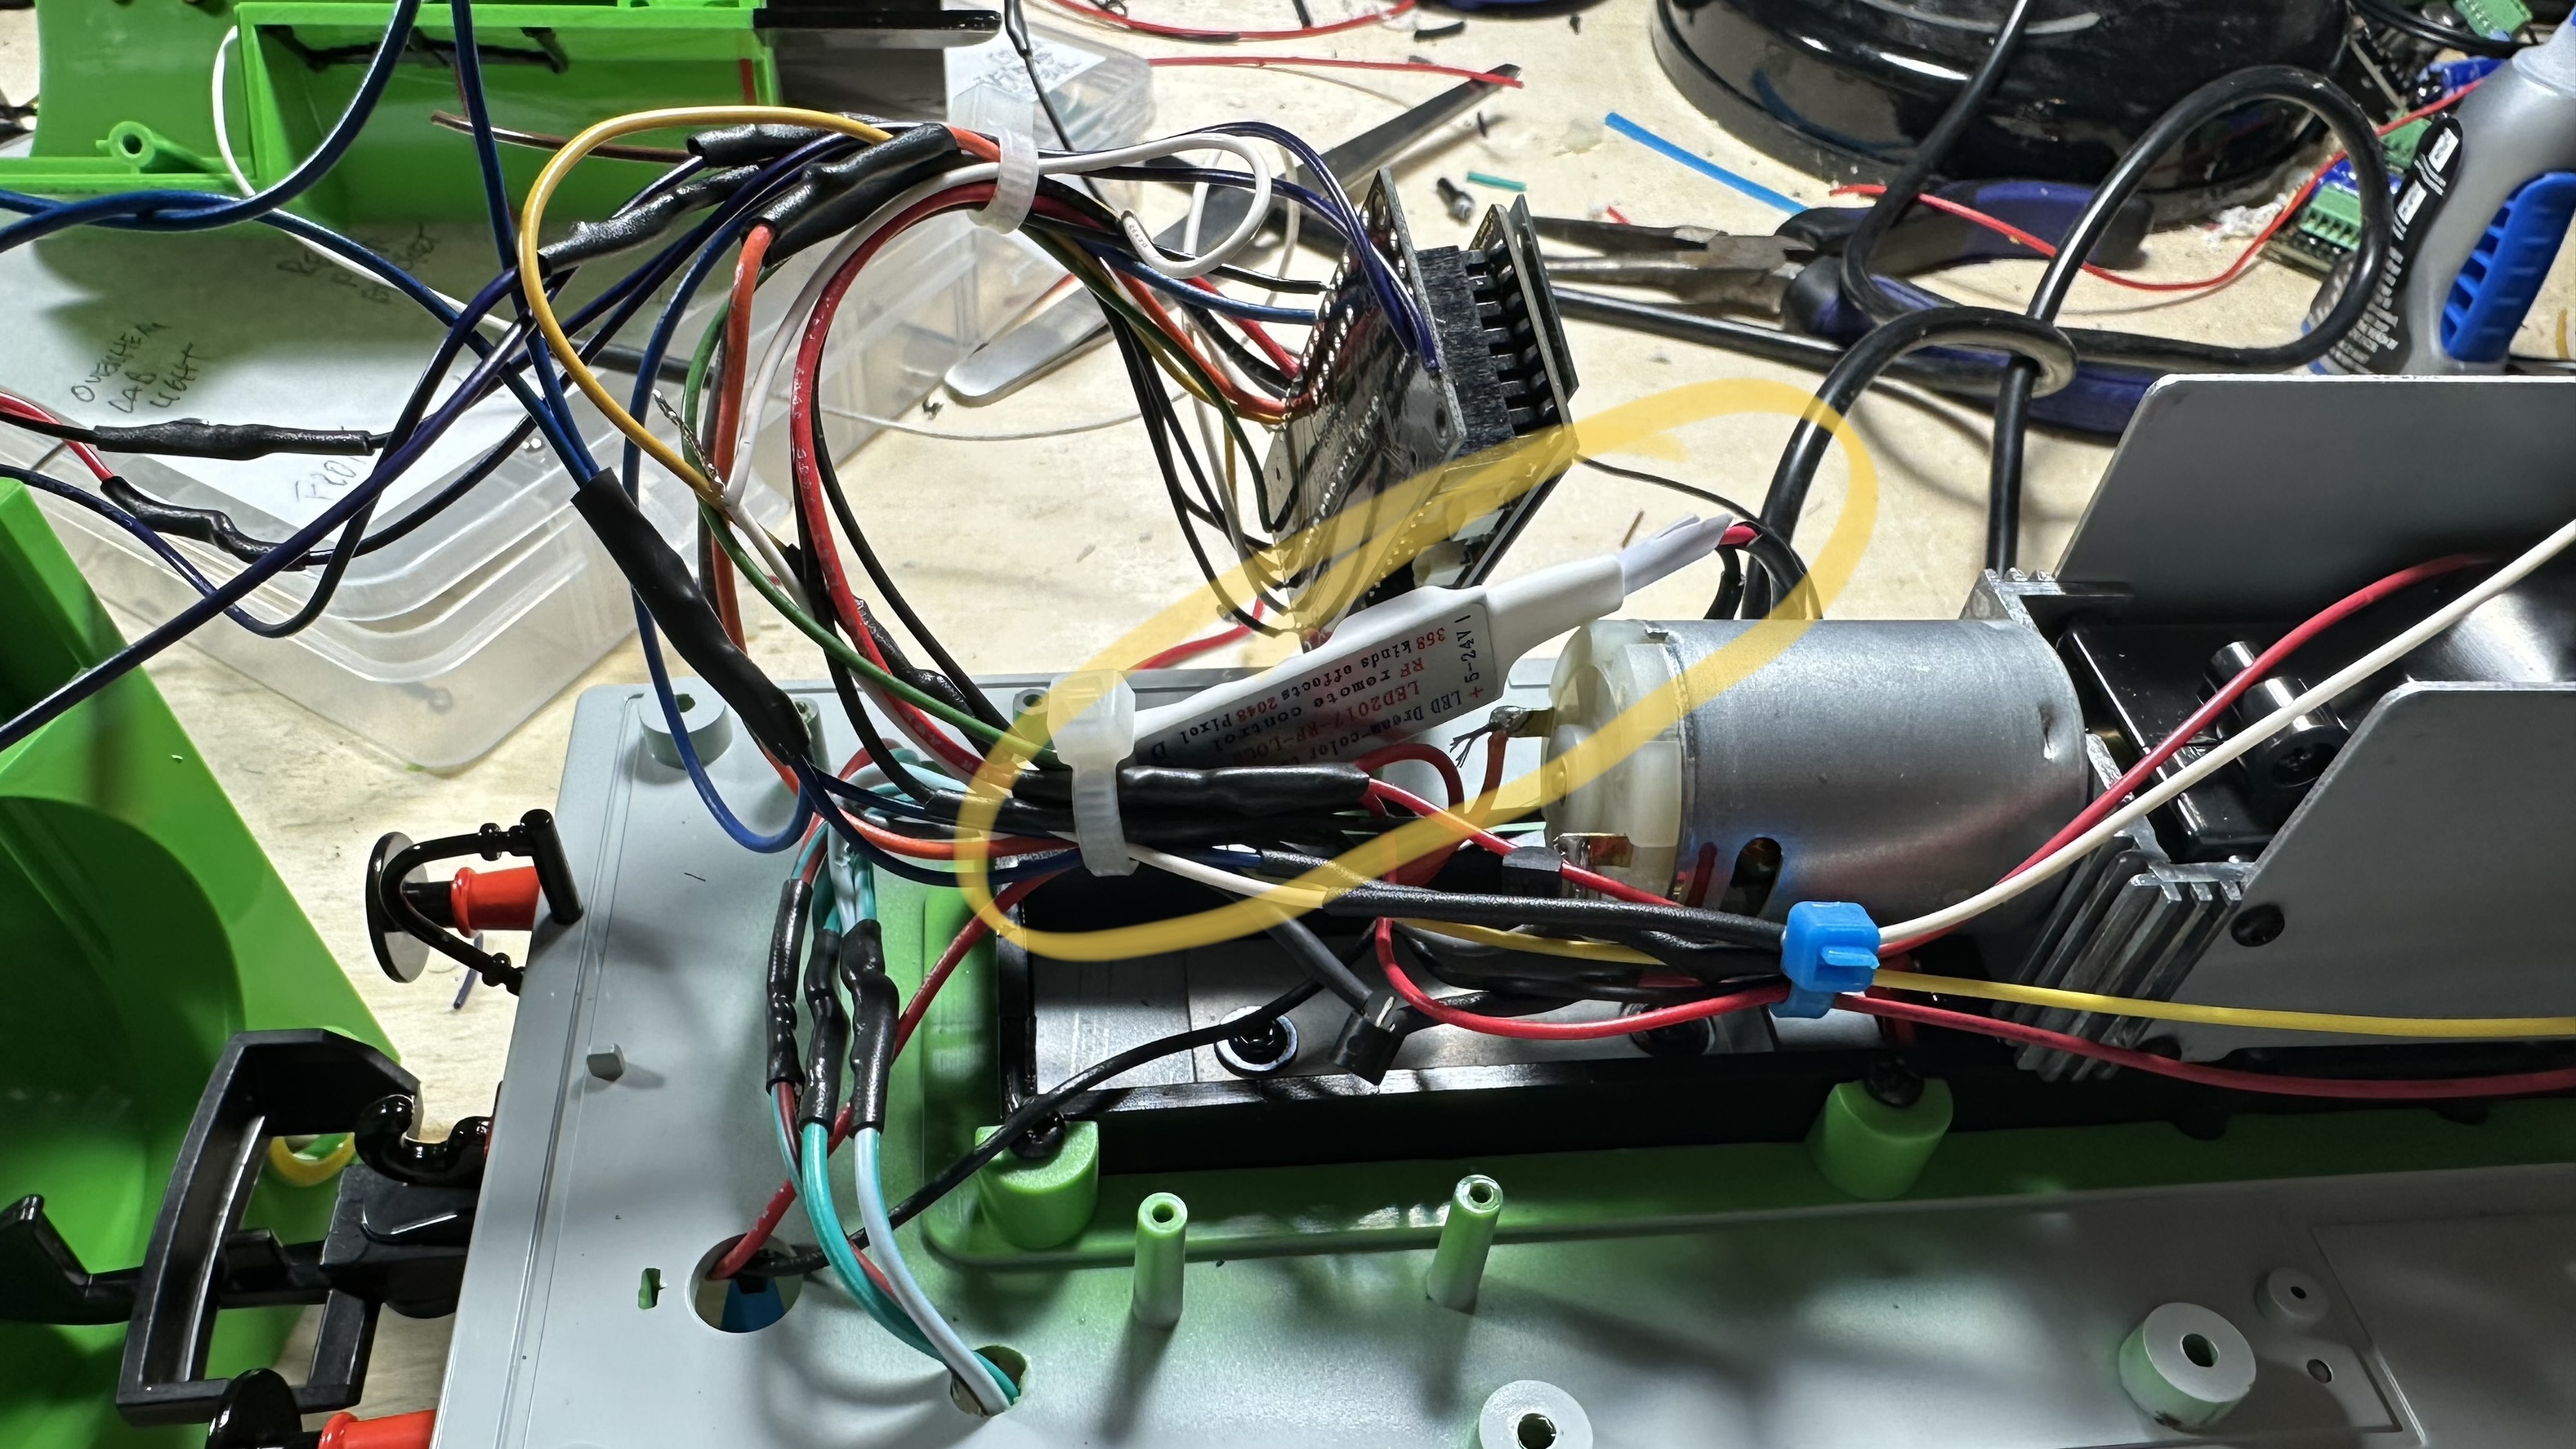


Step 5, I added a smoke unit. I use the Sleuth 5v smoke unit connected to the smoke output of the MS950.


Step 6, I added a special connector to allow me to connect track voltage to test the locomotive without having to run it on a track.
Here is a configuration for the Percy (Thomas Train) Engine:
Percy Steam Engine
Version w/ smoke w/ LED strip
Bachman Thomas Train Series
ID #6
MS950 v4.225 Loaded 4/20/23
File – Thomas Percy 7-4 v2.1 Loaded 4/20/23
CV#105 [Sound File Type] – 7
CV#106 [Sound File Subtype] – 4
CV#260 [version primary] – 2
CV#261 [version secondary] – 1
Base Version – Thomas Custom
F0 – Lights Latch {Front/Rear Lights}
F1 – Bell Latch Bell {Ditch Light}
F2 – Short Momentary Short Horn {Ditch Light}
F3 – Long Momentary Long Horn
F4 – Edi All Aboard Momentary Talking {Cab Light}
F5 – Simon Train Leaving Momentary Talking {Cab Light}
F6 – Nathanial Love Engineer Momentary Talking {Cab Light}
F7 – Betty Time for Grchildren Momentary Talking {Cab Light}
F8 – Mikey Dont Leave N&P Momentary Talking {Cab Light}
F9 – Joana Welcome Momentary Talking {Cab Light}
F10 -Percy Mail Song Script OnOff Wav Song {Strip LED}
F11 – Percy Train Song Script OnOff Wav Song {Strip LED}
F12 – Smoke Latch {Smoke}
F13 – Sound at 0% Toggle
F14 – Sound at 10% Toggle
F15 – Sound at 25% Toggle
F16- Sound at 50% Toggle
F17 – Sound at 75% Toggle
F18 – Sound at 100% Toggle
F19 – Sound at 140% Toggle
Decoder Control
Brakes Squeal – brake squeal
Start Whistle – Short Whistle
Change Direction – Short Whistle
Cornering Squeal – brake squea
Random Vol Min Max Length Idle Run
1 – Short Whistle 30 40 5 x x
2 – Bell 80 100 10 x x
Min-Max – Sounds plays in this range after sound ends
Length – Length of sound
Idle – Sound plays when engine stopped
Run – Sound plays when engine running
Sound Key Control – Set for sounds to be on whenever power turned o
Drive Sounds and Random Sounds On/Off – always on [function key, always on}
User Sounds (Function Sound) On/Off – always on [function key, always on}
Cylinder Valves (Blow Off) On/Off – no key assigned {function key, no key assigned}
Mute On/Off – [not inverted] – not assigned {function key, not assigned}
[either function key, always on, or no key assigned]
CV#266 (Total Sounds) [64 100%, max 100] – 64
CV#296 (Max Motor Sound) – 175
CV#376 (Driving Sounds Mute) [255 max] – 175
CV#588 (Driving Sounds) – 175
Special Wiring Instructions
Make sure forward and reverse motor wires are correct and wired for normal
Type 1 ditch lights are on when the headlight is on, and alternately flash when the horn is blown
Type 2 ditch lights are normally off unless the horn is blown
Strip LED
Connect one side to FA1
The other side to +5V Servo Voltage
Check +/- Polarity for Strip LED Controller
Front (white) left front (5mm Bright)
type 1 ditch light, forward only
#125 – 33
Rear (yellow) right front (5mm Bright)
type 1 ditch light, forward only
#126 – 37
#393 – 3 (Ditch Light on for Bell and Horn)
#64 – 15 (Ditch Light Time Off)
FO1 (green) LED strip light controller
set for F10, F11, F13
#127 – 0
FO2 ( brown) ….. not connected
FO3 (yellow) rear (5mm Bright)
reverse only
#129 – 2
FO4 (purple) cabin (5mm Warm)
warm white led light glued to front of console in cab
(set for F4, F5, F6, F7, F8, F9)
#130 – 0
FO5 (white) smoke 5v unit
connected to smoke output on MS950
#131 – 72
#137 – 128
#138 – 194
#139 – 255
#353 – 12 ( 5 min shutoff)
set for F12
FO6 (black.) ……. not connected
CV Changes
266 – 64 Total Volume (Max)
376 – 128 Running Engine Volume at 50%
395 – 64 Max Volume Button Sound Level
Function Keys
#33 – 3, #34 – 16, #35 – 0, #36 – 0, #37 – 0, #38 – 32, #39 – 32
#40 – 32, #41 – 32, #42 – 32, #43 -32, #44 – 4, #45 – 4, #46 – 64, #61 – 97
Swiss Mapping for F13
#430 – 13
Function Key,
#431 – 0
No Secondary,
#432 – 1
Function Output Forward
#433 – 0
Function Output Forward,
#434 – 1
Function Output Reverse
#435 – 0
Function Output Reverse
3/16” front part of led
1/4” full led light
8.5mm (11/32) Smoke Unit


Hi Mike,
Take care,
Lee