My daughter and son-in-law live in Germany in an apartment. They have two children and part of my theme with the grandchildren are trains. We gave 14 grandchildren so that takes a lot of work !
After some discussion they decided to install a shelf layout train in their living room. In order to work through some issues, I decided to install a shelf layout in my condominium in Michigan. I liked this so much, I am now installing a shelf layout in my shop in Georgia. What turned out to be a small project turns out to be 3 projects. This blog will detail the initial concepts, my challenges and what I have learned.
Step 1 – Plan, Plan, Plan
Plan the layout using Modelrailroader Pro on my Macbook. I measure the space, load the walls and then layout the required track.
Here is the layout for the apartment in Hannover.

Here is the layout for my condominium
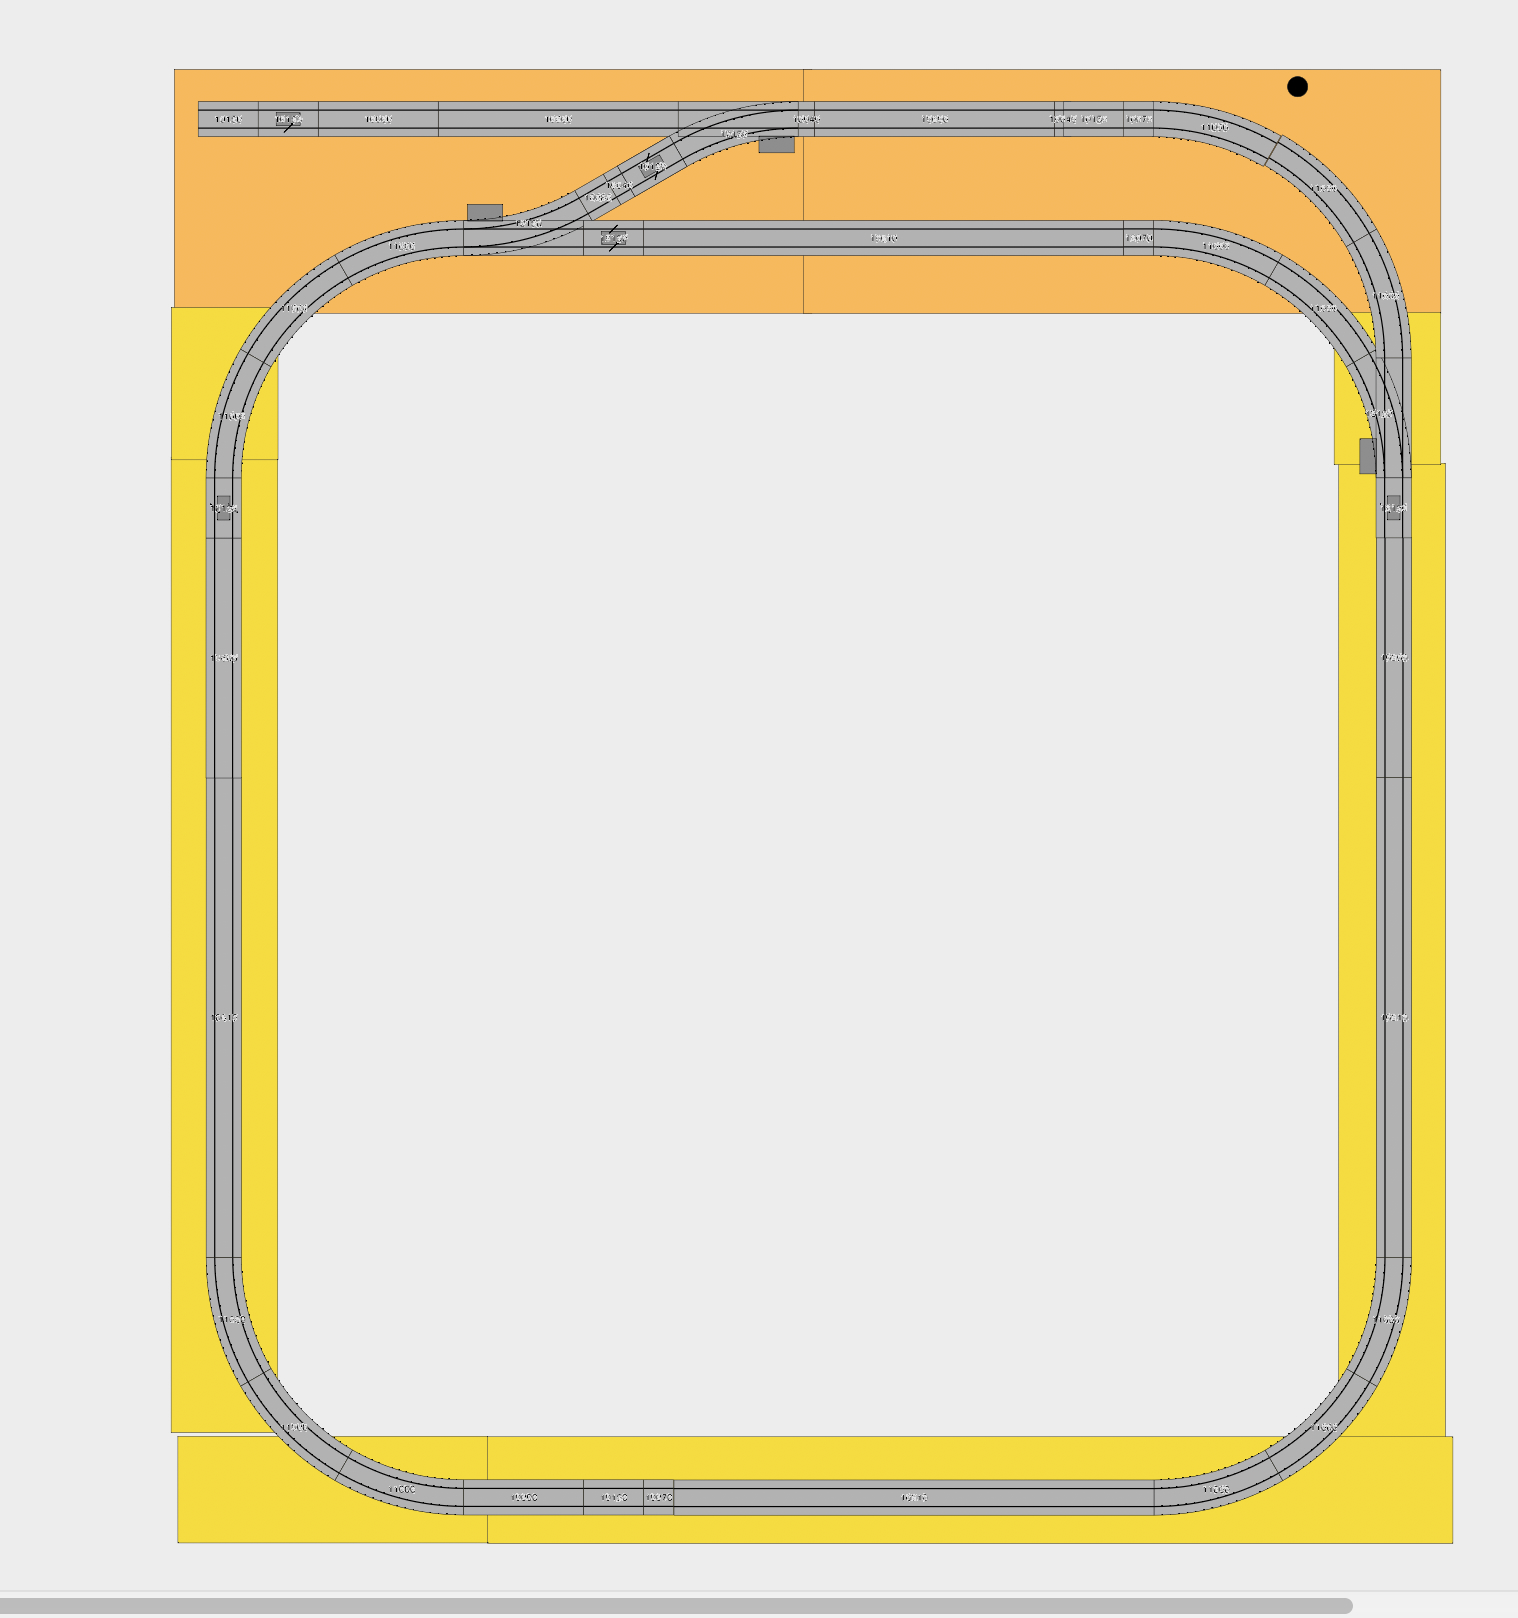
Here is the layout for my Shop

Step 2 – Plan, Innovate, Plan
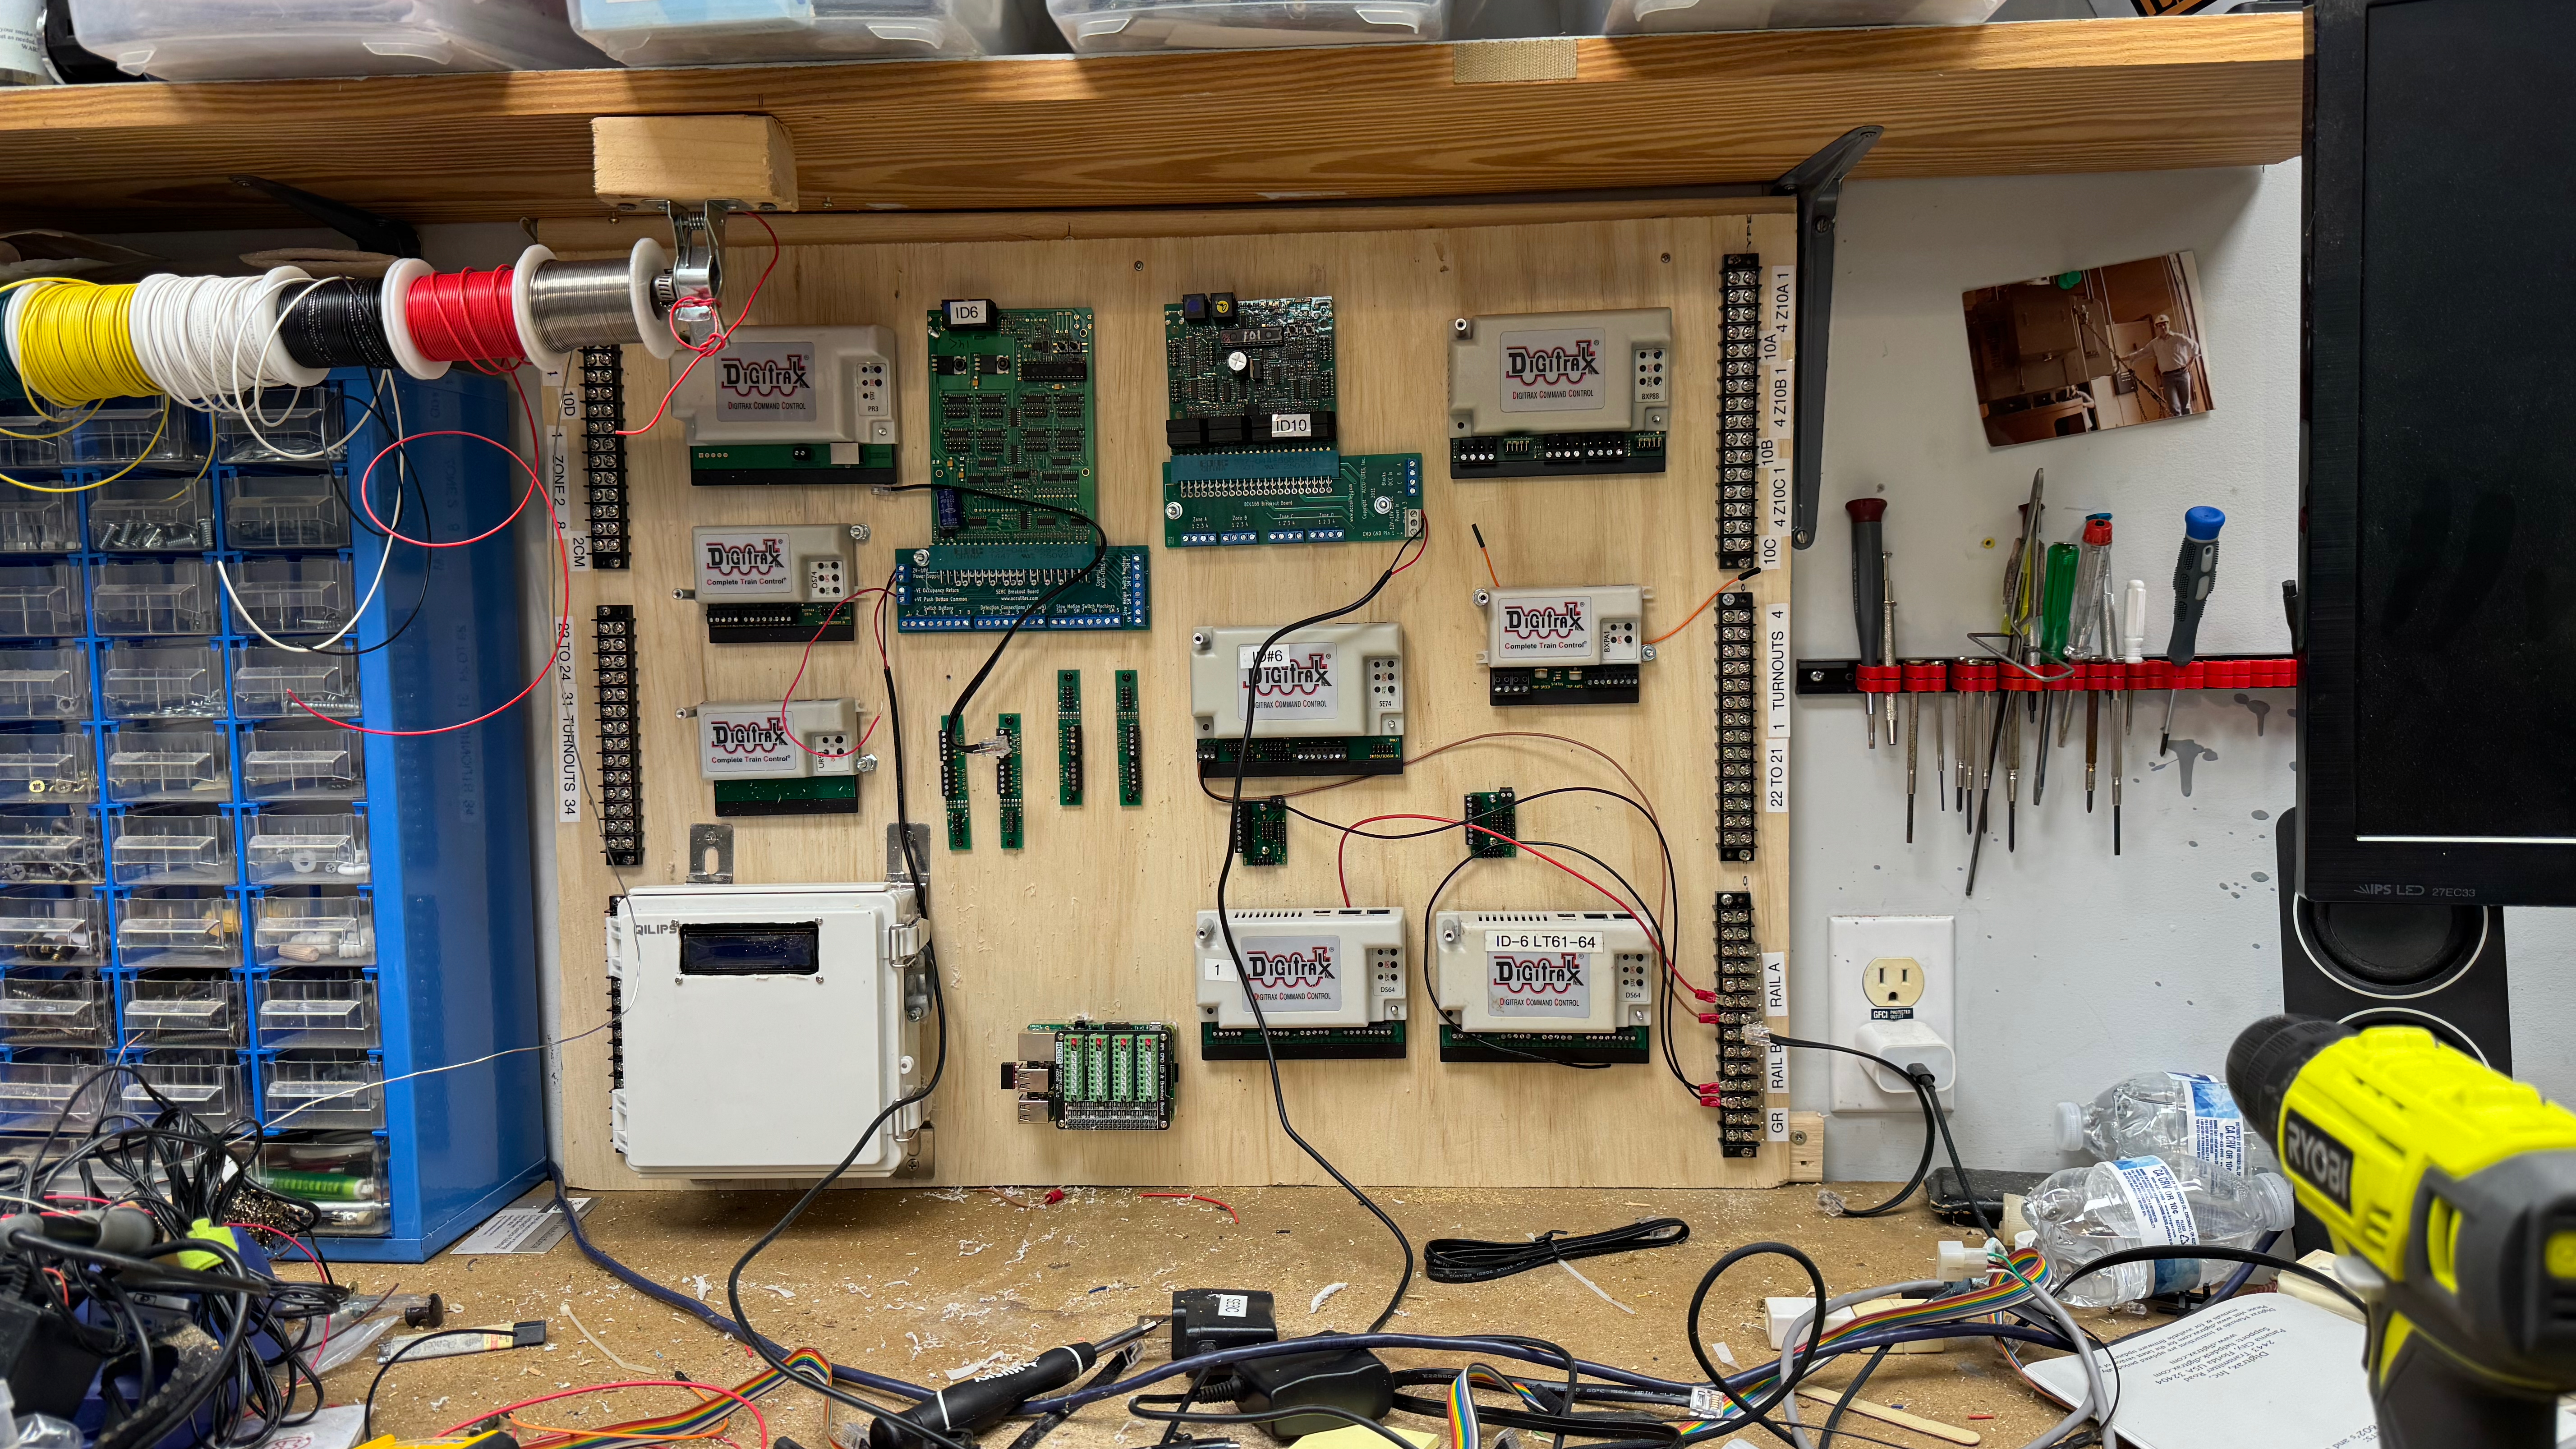
Determine the Controls for the layout. I decided that the layouts should be controlled by JMRI and Digitrax. JMRI will be running on the Raspberry Pi 4. JMRI is fully operational on the Pi. I will be using the i2c 16×2 LCD display to show the status. https://www.amazon.com/gp/product/B07S7PJYM6/ref=ppx_yo_dt_b_search_asin_title?ie=UTF8&psc=1 There is a great 10.1” touchscreen that I am using and will have Pi mounted behind it. https://www.amazon.com/dp/B0CJNKFVPY?psc=1&ref=ppx_yo2ov_dt_b_product_details Digitrax https://www.digitrax.com has several new components that I will be trying, the BXP88, SE74, UR93, and the BXPA1. I plan a new creating scripts to run each train. There will be several scenarios to switch behind.
Germany – 1, 2, 3, or 4 trains running
Condo – 1, 2, or 3 trains running
Shop – 1 thru 7 trains running
In order to switch between different programs I am using a touch screen and control box. In the JMRI panel I created a way to select different programs and then run, pause or stop them. I then duplicated this with hardware, the i2C display, buttons and LEDs.

Step 3 – Build the Layout
Build the shelves for the layout. I am trying to maintain at least 9” free height and 7.5” width on the layout but this will primarily be controlled by door heights and room challenges. Using Railmdelerprohttps://www.railmodeller.com/home-railmodeller.html I laid everything out including the track, wiring, shelving, brackets, and controls. For the shelves I am using wood shelving, plastic sheets, and hanging brackets. The brackets will come later on in the project. I decided to try clear plastic shelving so you can see the trains moving through the main/pass lines. I first tried 1/2” acrylic but found it be brittle and very heavy. I broke one of the pieces installing it the condo but was able to join it back together to use. For the shop I am trying 3/8” clear acrylic and it working out better. For single track I am using 7.5” shelving and for double track 16” plywood.
Step 4 – Install the Track
Lay the track. I am using LGB track with the standard connectors. Hopefully since it is not outside I won’t need split jaw connectors. I am creating zones and separating the zones with the 1105U and the 1105T. This simplifies the connection to wiring but a little more than expensive. The zones will be used by the JMRI programs to control the trains. I set up the connections to the zones to minimize the length of the wiring.
Step 5 – Wire up Control Boards and test remotely where possible
Wire up the control panel and box. I am using terminal strips to connect to the track wiring. I can also test the control panel before connecting it to the track.

Step 6 – Configure JMRI
JMRI configuration loaded into the program and Digitrax ids set for each of the boards. The key is no conflicts for the sensors which is sometimes difficult with Digitrax. https://www.jmri.org JMRI is an excellent program with a lot of functionality but it can get complicated if you want to go beyond the initial control available.
Step 7 – Test, Test, Test
Test the layout. While I can a lot of pre-wiring the layout still needs to be tested
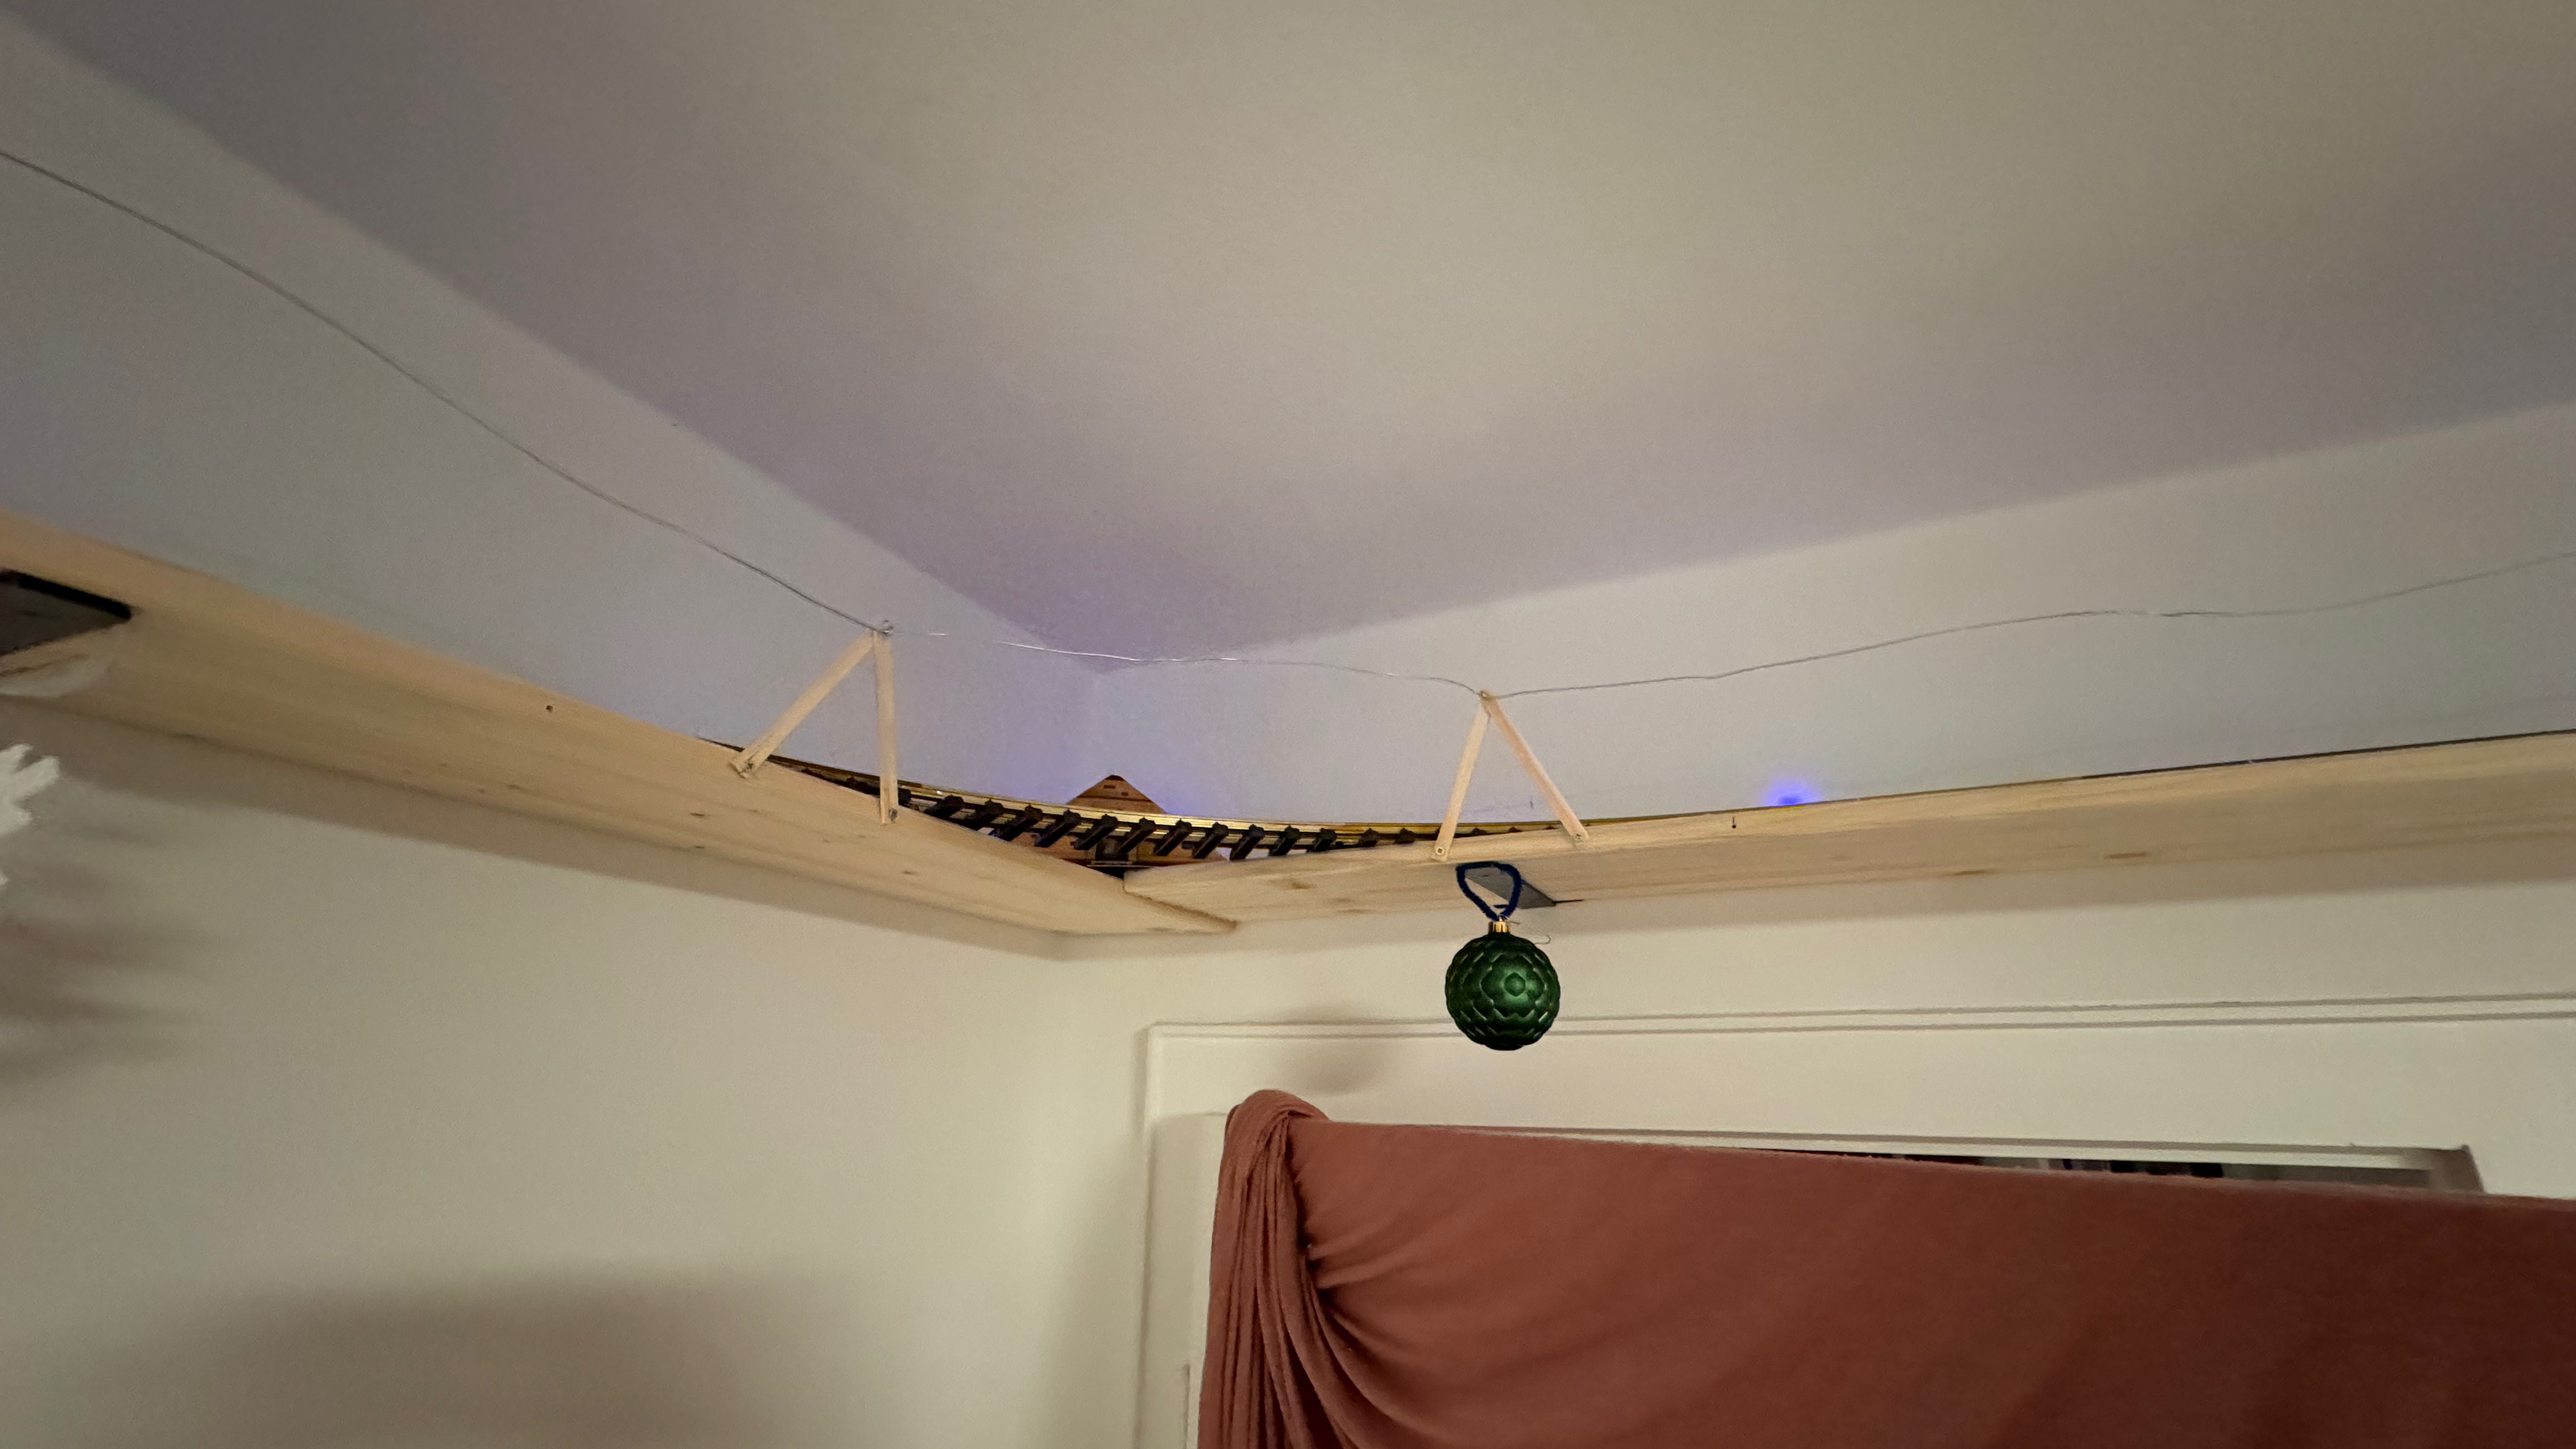
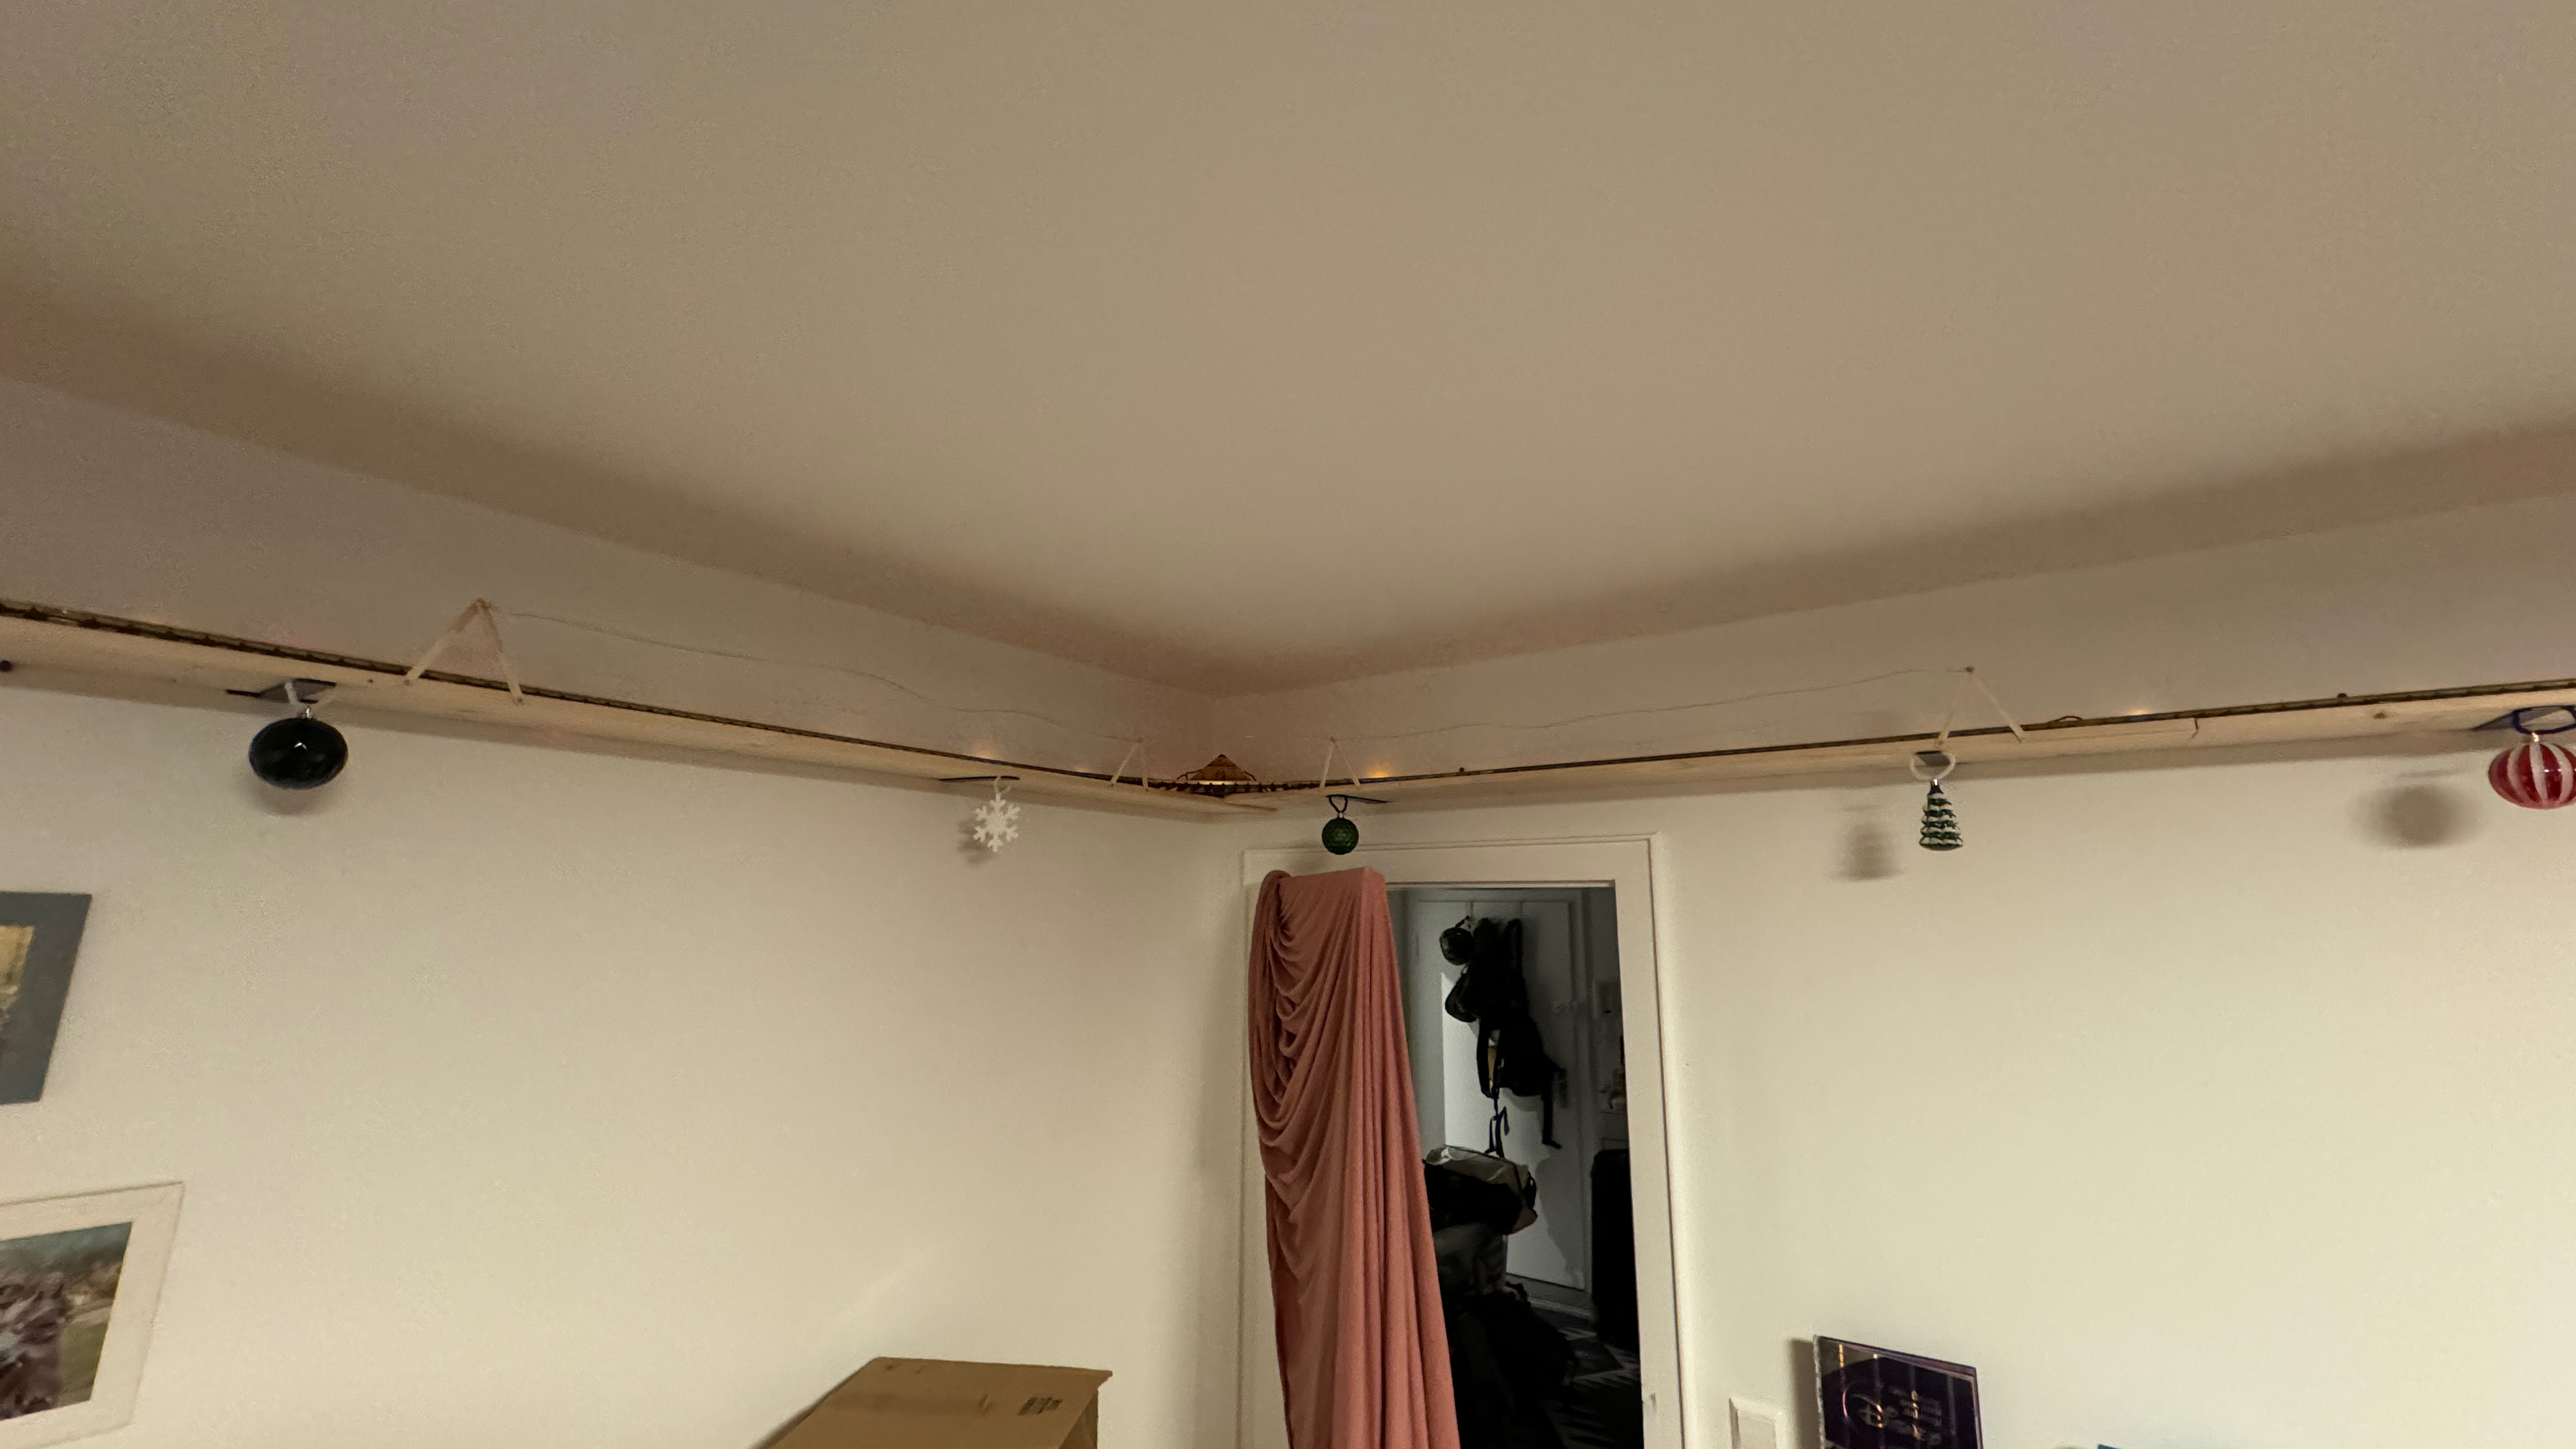
Step 8 – Need to stop those trains from falling off the Shelves [Guards are needed]
Install Train Guards – after running the train in Germany, Thomas derailed and took a fall. After that we decided to install guards on key areas of the trains. I created a simple wood support with an eyehole for wire or rope. In Germany we installed thin wire but it wasn’t always straight and didn’t look the best. In Battle Creek I build the brackets using thicker wood and a colored rope (clothes line). So far it looks great but hasn’t been tested during a derailment.

Step 9 – Write Software to control the trains
Write control programs – here in am getting creative with the Raspberry Pi. I am using MQTT to communicate from/to JMRI. MQTT is supported by JMRI and allows commands to be communicated to and from a server. I set up each Pi using the Mosquito server. The MMQTT server is limited and must utilize certain protocols but once you send the correct command to MQTT then you can activate sensors, toggle turnouts, control engines and turn on or offtrack power. Because MQTT is supported in the IoT space well I need to write programs to be run on the Native Pi. These programs listen for general commands from IoT devices and sends them to the MQTT server which the JMRI listens for and then controls programs, sensors and other JMRI actions. The IoT devices that I want to control JMRI are:
Wyze camera motion detection
Arlo camera motion detection
Sunset time
Command to and from my Smarthome utilizing the Universal Devices Eisy.
“Hey Google” spoken commands
“Hey Siri” spoken commands
In order to interface these devices I use IFTTT with the above IoT devices as the trigger and a webhook command back to my PI. I use bottle.py to listen for IFTTT webhook and then send the appropriate NQTT command to JMRI. Complicated but it works until something better comes along. I am using the GPIO input pins for a rain sensor and photoelectric sensor
I also need to output from JMRI scrips:
I need to write to my I2C display 16 characters, 2 lines. This display is used to show which program is selected and the program status. Unfortunately I cannot write directly from JMRI so I must use a script to send a command via MQTt to program running on the native Pi and then this program writes to the display connected to the GPIO pins on the Pi. I am also sending commands from JMRI scripts that will text a cellular number on different statuses of my programs. Not all Pi’s will be as complicated but some will. More on how I utilize these features
Step 10
Train control program – I write scripts(python programs) within JMRi to control the trains. A button on the control box or JMRI panel selects the program and displays it on the i2C display as well as on the JMRI panel. If the run button is pushed then the program starts, sends status to the display and texts the status. I also have a pause button to pause all the trains as well as a stop button to stop the program when complete
One of the layouts is outdoors and we are setting it up to run if motion detected and it is not raining. The train will run a loop starting from a storage shed and then returns there if no motion. The motion detection will come from Wyze cameras and will respond to animals as well as people. At sunset the track leds will turn on. The rain detections comes from a simple rain sensor connected to the SE74 input pins. https://www.amazon.com/gp/product/B01DK29K28/ref=ppx_yo_dt_b_search_asin_title?ie=UTF8&psc=1
For my indoor layouts the JMRI script can set the lighting level, and track LEDs. If motion is detected in the room the train sounds will blow its whistle and one of my grandkids will be saying “All Aboard” See my other posts on using custom sounds in Zimo Sound Decoders.
All the layouts can be controlled via Google home, Siri pods, or any smarthome using simple spoken commands. This is done through IFTTT as the spoken command triggers IFTTT and I then use Webhook to send a command to the Raspberry Pi.
I am on a cruise working these programs and I will update with any changes. See my Cruise blog for updates on how the train work is going.
Here is the layout in Germany and in Battle Creek !


Hi Mike,
Take care,
Lee